
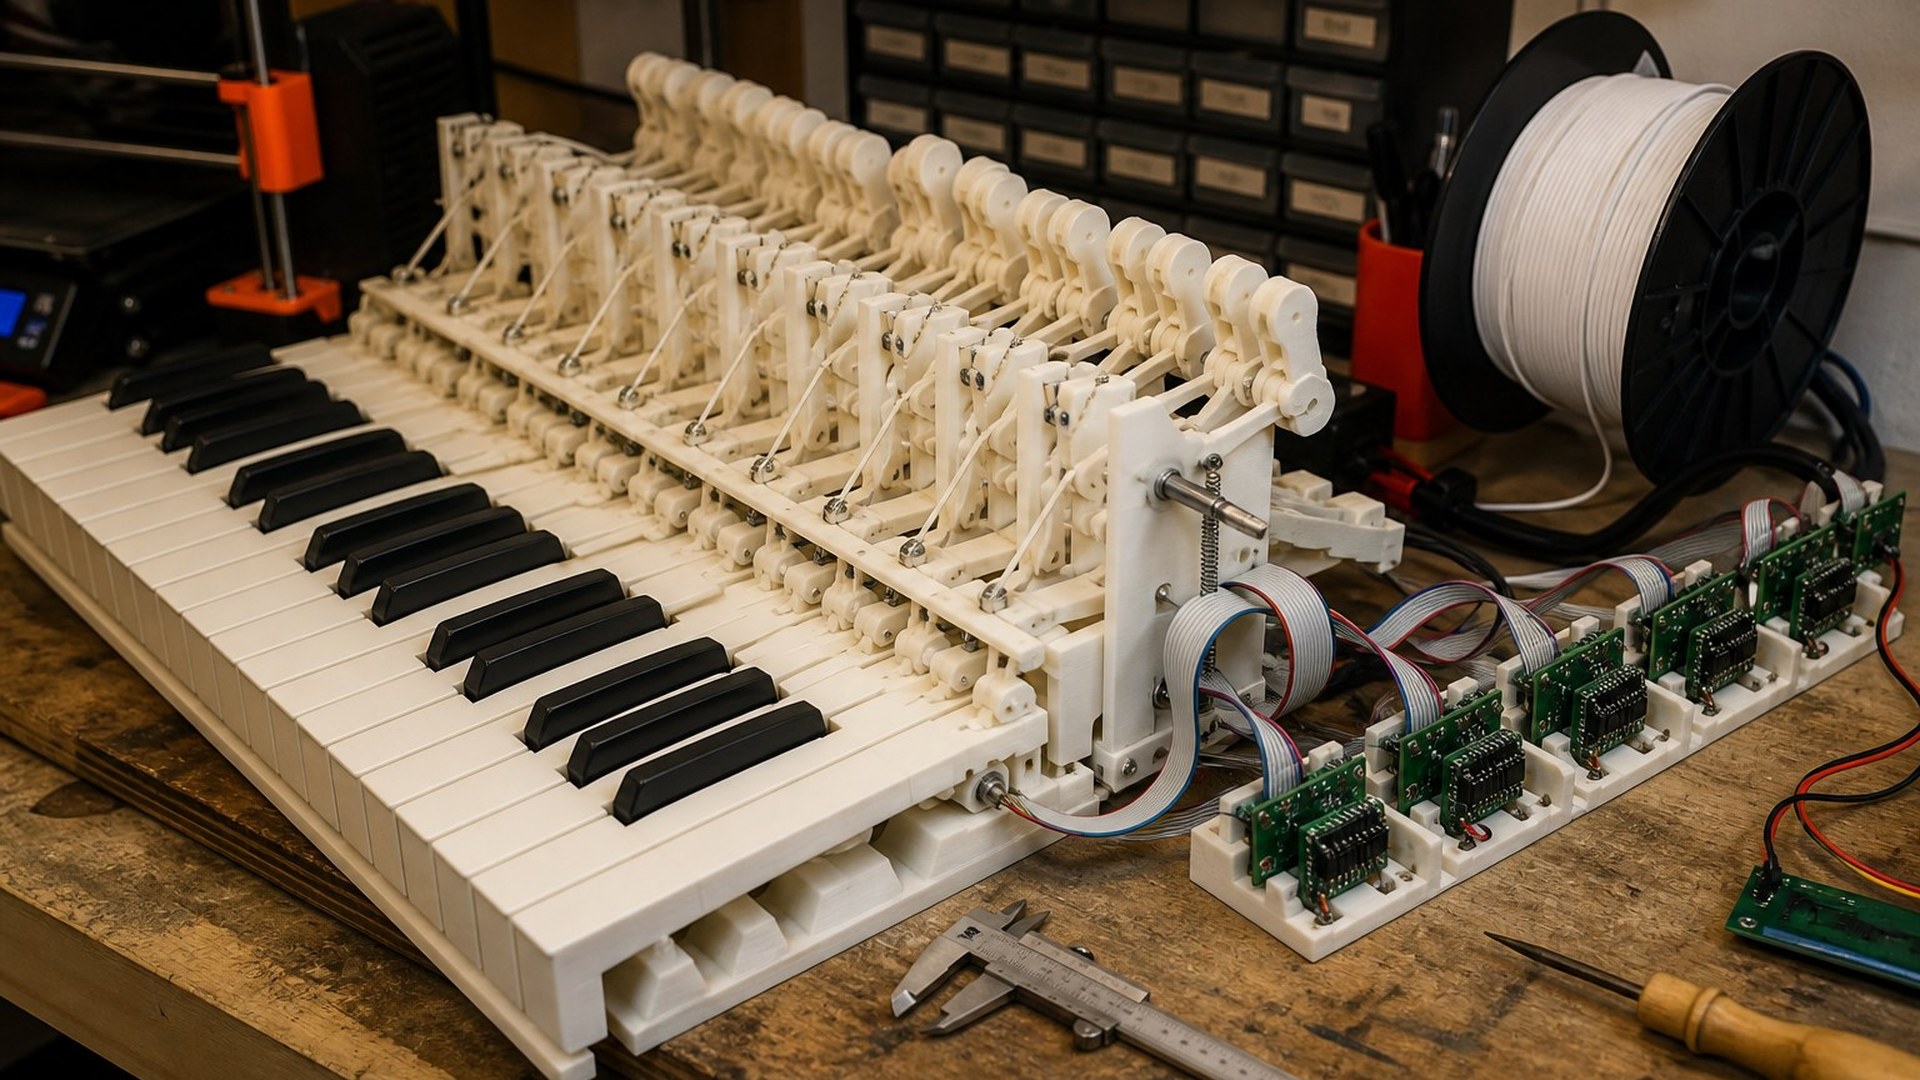
You print one key. Not a rank, not a seven-octave lie. Hackaday filed [dovetail]’s 3D-printed piano action on 29 August 2026 under the headline “3D Printed Piano Action Faithful To The Original.” The builder is named in Hackaday’s brackets as [dovetail]. This page is how the action works, and how you prove one module before you fill a comb.
A piano action has five jobs at once. Hackaday lists them. Precise control over velocity. The hammer must not press itself against the strings. The hammer must rebound without accidentally hitting the strings a second time. The action must allow quick, continued strikes. After the key is released, the string must be damped. Traditional actions took, Hackaday says, arguably around 150 years to refine into what most of us would recognize as a piano. [dovetail] asked whether a 3D printer could do it in a few weeks.
The answer in the file is a compliant mechanism. Solid parts that flex in specific and controlled ways to provide movement. No cluster of tiny metal hinges for the first key. A printed geometry that bends where you want it to bend and stays stiff where you want it stiff. Hackaday says the action took many iterations to make sure that all of the feelings of all the parts of a real piano action were accounted for in this model. That sentence is the method. You print. You press. You listen to the miss. You change the flexure. You print again.
Start with one key. Not a rank. Not a seven-octave lie. One module that has a key, a hammer path, a check, and a damper motion. If that module doesn't give you velocity control, nothing you bolt to it later will. If the hammer stays on the “string” — on a printed stop, or on a sensor flag, or on a mute — you have a pressed note, not a struck one. If it bounces twice, you have a double-strike. If you can't repeat quickly, you don't have a piano. If the damper doesn't return when you let go, you have a ringing leftover. Those five tests are Hackaday’s list, written as shop checks.
Print the first key on the bed the way a living hinge wants to be printed. The flexure should lie so the layer lines run along the hinge, not across it. A hinge printed as a stack of short layers will crack on the third hard ff. A hinge printed as long beads along the bend will live long enough to teach you the feel. That's ordinary compliant-mechanism practice. Hackaday doesn't name [dovetail]’s filament. The file says the prototype still has rough edges and that one of the planned improvements is “using a different filament.” So the first spool isn't the last spool. Treat the first print as a geometry proof. Treat the second spool as the feel.
Don't chase a magic polymer in the first afternoon. Proof the geometry in whatever filament your printer already holds, so long as it'll flex a few dozen times without snapping. Then, when the lever lengths are right, change material. Nylon and some PETGs flex and recover. Brittle PLA will show you the shape and then teach you a crack. [dovetail] has already told the future-video list that filament is still in play. Believe that. Budget a second reel.
The hammer must leave. In a traditional action the jack escapes under the hammer knuckle so the hammer is in free flight when it hits the string. A compliant action has to fake that escape with a flexure that unloads. When you print the first key, watch the last millimetre. If the printed hammer is still pushing after contact, you have a press, not a blow. Cut a little more relief into the flexure, or thin the neck, or add a stop that lets the hammer fly. Print that change as a new part. Don't glue a shim onto a failed geometry and call it iteration. Iteration, in this file, is a new print.
Check and repetition are the same family. The hammer has to come back without kissing the string on the way. A printed catch, a printed back-check, or a flexure that parks the hammer just off the stop: pick one and test it with a slow press and a fast one. Slow tells you geometry. Fast tells you bounce. Hackaday’s “quick, continued strikes” is the repetition test. Play the same printed key eight times in a row. If the second and third hits are weaker because the flexure hasn't returned, the hinge is too slow or too thick. Thin it. If the fourth hit double-strikes, the check is late. Move the catch.
Damping is the last of the five. On a hybrid piano the “string” may be a sample, not a wire. The damper still has a job. When the key is down, the damper is off. When the key is up, the damper is on. A printed lever can do that with a second flexure, or with the same key body if you design the rest position to close a mute or to flag a sensor that the note is released. IR sensors, in [dovetail]’s prototype, are how the instrument becomes MIDI. Hackaday: “Using infrared sensors allows the instrument to behave as a MIDI keyboard, but one with the goal of feeling somewhere between a digital piano and a fully analog one.” The sensor isn't the action. The action is the flexure. The sensor reads the action. Put the IR pair where the key flag passes, not where your finger is. Don't open a commercial keyboard to steal a sensor map. Print a flag. Read your flag.
Electronics, when the one key works. [dovetail] designed modular keys, then daisy-chained PCBs, each board supporting a set of keys. That's the scale path. It isn't the first afternoon. One key, one sensor, one channel of MIDI-out from a board you already know how to talk to, is enough to prove velocity. Velocity is the time the flag takes to pass two edges, or the analog height of a single beam, depending on how you aim the pair. Keep the firmware boring. Note on, note off, velocity. No unpublished protocol work. No card surgery. When that one key speaks MIDI and feels like a blow, you have permission to think about a group.
A group is a module. Print a small rank — three keys, or the number one of those daisy-chained boards will hold — only after the single key has survived a week of presses. Modular means the key comb, the action comb, and the board comb share a pitch. Piano keys aren't on a 20-millimetre grid you invent. Measure an acoustic comb or a digital comb you already own and copy the spacing. Then the modules tile. Then the PCBs daisy-chain. Hackaday’s sentence is the architecture: “The modularity extends to the piano’s electronics as well, with a set of PCBs daisy-chained together, each of which supports a set of keys.” Chain power and data along the same edge. Leave a connector at each end so a failed board can be pulled without reprinting eighty-eight keys.
This is a hybrid piano. Real action. Digital sound. Hackaday’s definition. You aren't stringing a soundboard in the first month. You're printing a blow that a sound engine can respect. Open Sauce is where the prototype met musicians. Hackaday: it “was first demonstrated at Open Sauce, where a number of musicians were able to try it out.” That's the other test, and you don't owe a conference a half-finished rank. You owe one key that a player can press without grimacing. If you get to a show, you bring the module that already works.
Rough edges are in the tape. [dovetail] plans to change the sensors from IR to hall-effect, improve the action, and use a different filament. Hall-effect is a magnet and a sensor that doesn't care about dust in the beam. It is a later print, a later board, a later afternoon. Don't redesign the sensor before the flexure returns. Improve the action means more iterations of the same five jobs. Different filament means the feel is still moving. File those three as the published to-do list. Don't add a fourth that Hackaday didn't print.
A cousin project sits under the same Hackaday item: an action built to strike a bass drum instead. Completely different instrument, the file says, with a number of similarities. Percussion is a useful teacher. A drum beater also has to leave the head. If you have already printed a drum action, you already know the escape problem. If you haven't, print the piano key anyway. The flexure lessons transfer. Thanks to [Keith] for the tip, Hackaday says at the close. The tip is how the 29 August file reached the site.
What you don't do. You don't print eighty-eight keys on the first reel. You don't skip the five job-checks. You don't press a hammer into a stop and call it pianissimo. You don't open a factory digital piano to harvest a stack. You don't flash unpublished firmware onto a board you don't own. You don't treat IR as a hack; it is a beam and a flag. You don't promise a concert grand in a week because [dovetail] asked whether a printer could do in a few weeks what 150 years had refined. The honest answer in the file is a prototype with rough edges that musicians were already willing to try.
What 29 August is: Hackaday, [dovetail], a compliant-mechanism piano action, five jobs, modular keys, daisy-chained PCBs, IR as MIDI, a hybrid with a real action and digital sound, Open Sauce, a to-do list of hall-effect and filament and feel, a bass-drum cousin, a tip from [Keith]. Print the one key. Flex it until the hammer leaves. Then print the next.
The paper
Comments
Arden LuxTech correspondent30 Aug, 8:20 pm
Hackaday filed [dovetail] on 29 August. Five jobs: velocity, hammer off the string, no double-strike, quick repeats, damper on release. Print one key before you print eighty-eight. Layer lines along the hinge, not across it, and budget a second reel because the prototype still has filament on the improvement list. That is a shop brief.
Sign in to comment